Computer
What is Mail Merge in MS word, How to use it(Updated)


Mail merge is a useful tool that will allow you to easily produce multiple letters, labels, envelopes, name tags, and more using information stored in a list, database, In Microsoft Word. In this article, I explain what is Mail Merge in MS Word, How to use mail merge step by step.
What is Mail Merge in MS Word?
Mail merge is a feature within most data processing applications that enables users to send a similar letter or document to multiple recipients. Mail Merge is a useful tool that will allow you to easily produce multiple letters, labels, and envelopes, using information stored in a list, or database, In Microsoft Word. This file can be a spreadsheet or database file containing separate fields for each different type of information to be merged within the letter.
How to use mail merge step by step:
- Open an existing Word document, or create a new one.
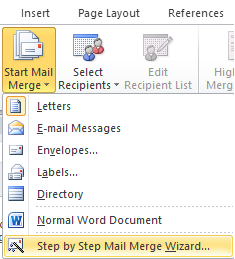
- Click the Mailings tab.
- Click the Start Mail Merge Command.
- Select step by step Mail Merges Wizard.
The MailMerge task pane appears and will guide you through the six main steps to complete a mail merge. The following is an example of how to create a form letter and merge the letter with a recipient list.
Read Also: 20 Interesting Facts About Computer
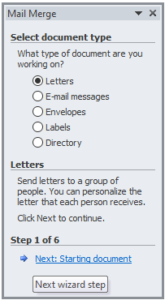
- Step 1:
- Choose the type of document you wish to create. In this example, Select Letters.
- Click Next: Starting document to move to Step 2.
- Step 2:
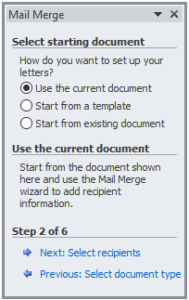
- Select use the current document. Click Next: Select Recipients to move to Step3
- Step 3:
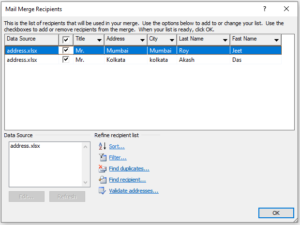
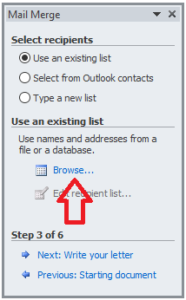
Now you will need an address list so that word can automatically place each address into the document. The list can be in an existing file, such as an Excel Workbook, or you can type a new address list from within the MailMerge Wizard.
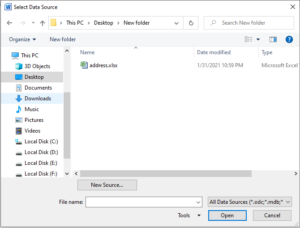
1. From the Mail Merge task pane, select Use an existing list and then click Browse.
Read More: What Is Algorithm in Computer
3. If the address list is an AccessDatabase, select the Table that contains the list and click Ok.
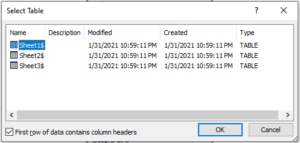
5. From the Mail Merge task pane, click Next: Write your letter to move to step4.
- Step 4:
To Insert Recipient Data:
1. Place the insertion point in the document where you wish the information to appear.
2. Select Address block, Greeting line, Electronic Postage, or More items from the task pane.
3. Depending on your selection, a dialog box may appear with various options. Select the desired options and click OK.
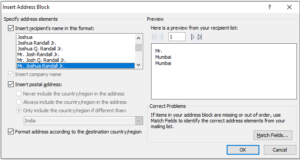
4. A placeholder appears in your document. For Example:”AddressBlock”.
5. Repeat these steps each time you need to enter information from your data record.
6. From the Mail Merge task pane, click Next: Preview tour letters to move to step5.
-
Step 5:
- Preview the letters to make sure the information from the recipient list appears correctly in the letter. you can the left and right scroll arrows to view each document.
- Click Next: Complete the Merge to move to step6.
Read More: Explain the generation of computers
- Step 6:
1. Click Print to print the letters.
2. The Merge to Printer dialog box opens. Click all, and then click OK.
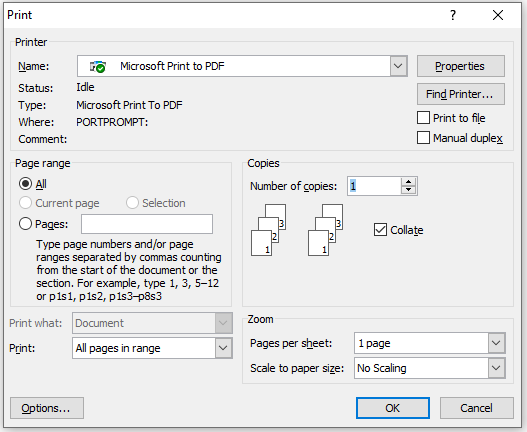
3. The print dialog box will appear. Adjust the print setting if needed, and then click OK.
I hope you get the all information about Mail Merge in MS word and How to use it. If you like this article, you can share and comment. So that we too have a chance to learn something from your ideas and improve something.
Read Also:

Computer
Explain How to Write Curve,bend and wrap text in ms word


Microsoft Word is one the most useful Software for office work, Student presentation, and many more. We use Curve, bend, and wrap text in ms word many times as an office, collage, School presentation Heading. In this article, You will know how to Write Curve, bend, and wrap text in ms word Step by step.
Why do we use Curve, bend, and wrap text in ms word?
Curved text is used when you design a flyer, newsletter, and logo in your Word document to enhance the look of the presentation. Microsoft Word has a very easy way to Write Curve, bend, and wrap text.
How to Write Curve, bend, and wrap text in MS Word Step by step:
Step 1: Open the new or an existing Word document.
Step 2: Highlight or select the text that you want to curve, bend, or warp.
Step 3: Go to the Insert tab on the Ribbon and click on the WordArt icon in the Text section.
Read Also: What is Mail Merge in MS word, How to use it
Step 4: A list of WordArt will appear. Select the letter style from the WordArt list to apply to the text.
Step 5: Once WordArt is added to your text, a new menu Drawing tool is created automatically. Now, go to the Format tab on the Ribbon and click on the drop-down icon then click Text Efforts in the WordArt Styles section.
Step 6: Click on the Transform option from the Text Effects drop-down menu. Select the curve that you want to apply in the selected text.
Result: Now your Selected word is Transformed in your chosen style(Curve, bend, and wrap).
I hope you get the all information about How to Write Curve, bend, and wrap text in ms word. If you like this article, you can share and comment. So that we too have a chance to learn something from your ideas and improve something.
Read Also:
- Explain the generation of computers
- Explain What are Webmail and Email
- What is logic Gates in Computer With Example
Computer
Explain Lookup function in Excel | Explain V and H lookup Function


Lookup is one of the most used full functions in Microsoft Excel. It’s used to categorize under Excel Lookup and reference functions. In this article, I explain What is the Lookup function in Excel | Explain V and H lookup Function
Explain Lookup function in Excel
The LOOKUP Function is categorized under Excel Lookup and reference functions. This section discusses various techniques that you can use to look UP a value in a range of data Excel has three functions(LookUP, V LookUP, H LookUP) designed for this task.
A Look-UP formula essentially returns a value from a table by looking up another related value. A common telephone directory provides a good analogy. If you want to find a person’s telephone number, You first locate the name and then retrieve the corresponding number.
Example of LookUp Function in Excel :
In Worksheet that uses Several look UP formulas. This Worksheet Contains a table of employee data, beginning in row 7. This range name is EmpData. When you enter the last name into cell C2, lookup formulas in D2:G2 retrieve the matching information from the table. If the last name does not appear in column C, the formulas return.
The following lookup formulas use the Vlookup function:
- D2 = VLOOKUP (C2, EmpData,2,FALSE)
- E2 = VLOOKUP (C2, EmpData,3,FALSE)
- F2 = VLOOKUP (C2, EmpData,4,FALSE)
- G2 = VLOOKUP (C2, EmpData,5,FALSE)
Explain V-Lookup Function in Excel
The VLookup function looks up the value in the first column of the lookup table and returns the corresponding value in a specified table column. So, the lookup table arranges vertically.
The syntax for the VLookUp Function is: VLOOKUP(lookup_value,table_array,col_index_num,range_lookup)
The VLookup Function’s arguments are as follows:
- lookup_value: The value is to be in the first column of the lookup table.
- table_array: The range that contains the lookup table.
- col_index_num: The column number within the table from which the matching value is in return.
- range_lookup: Optional. If TRUE or omitted, an approximate match is returned. However, If FALSE, Vlookup will search for an exact match and, if Vlookup can’t find an exact match, the function returns #/NA.
Explain H-Lookup Function in Excel
The HLookup function works just like the VLookup function except that the lookup table is arranged horizontally instead of vertically. The HLookup function looks up the value in the first row of the lookup table and returns the corresponding value in a specified table row.
The syntax for the HLookUp Function is: HLOOKUP(lookup_value,table_array,row_index_num,range_lookup)
The HLookup function’s arguments are as follows:
- lookup_value: The value is to be in the first row of the lookup table.
- table_array: The range that contains the lookup table.
- row_index_num: The row number within the table from which the matching value is in return.
- range_lookup: Optional. If TRUE or omitted, an approximate match is returned. However, If FALSE, Vlookup will search for an exact match and, if Vlookup can’t find an exact match, the function returns #/NA.
I hope you get the all information about Explain Lookup function. V and H lookup Function in Excel with Example. If you like this article, you can share and comment. So that we too have a chance to learn something from your ideas and improve something.
Read Also:

- What is Mail Merge in MS word, How to use it.
- Difference between Vector and Raster graphics
- Algorithm in Computer
Computer
Difference between Vector and Raster graphics?Example


Graphics help us to see the photo, video, Animation Popularly, and Vector Graphics are sharp and detailed than Raster Graphics. In this article, I Explain the Difference between Vector and Raster graphics with Examples.
What is the difference between Vector and Raster graphics?
Graphics are part of Multimedia. In Digital media like Photo, Video, Animation all these things are made by graphics. Graphics are two types Vector Graphics and Raster Graphics.
Vector Graphics |
Raster Graphics |
---|---|
Vector Graphics are composed of paths. | Raster graphics are composed of pixels. |
Vector Graphics such as a.eps file or Adobe Illustrator file are composed of paths or lines, that are either straight or curved. | Raster graphics Such as a .gif .jpeg is arranging of pixels of various colors, which together form an image. |
The data file for a Vector image contains the points where the paths and ends how much the path curve, and the colors that either border or fill the paths. | Raster graphics, on the other hand, become “blocky” since each pixel increases in size as the image is larger. |
Vector Graphics is Capable of detailed editing. | Raster graphics are Less detailed but offer precise paths. |
Read Also: What is Multimedia in Computer With Example
Example of Vector Graphics Software with Format:
- Adobe Illustrator.
- CorelDraw.
Vector Graphics typically saved as EPS, AI, SVG, PDF Format.
Example of Raster graphics Software with Format:
- Adobe Photoshop.
- Gimp.
Raster Graphics saved as JPG, GIF, PNG, TIF, BMP Format.
I hope you get the all information about the difference between Vector and Raster graphics with Example. If you like this article, you can share and comment. So that we too have a chance to learn something from your ideas and improve something.
Read Also:

-
News15 hours ago
Nintendo Switch: 4 New Free Games Sega for Online Subscribers
-
News14 hours ago
BGMI Crosses 100 million Milestone, Krafton’s big announcement on the occasion of one year anniversary
-
News13 hours ago
Tata Motors set new records every month, car sales up 84% in June, demand for electric models soars
cbd effects when mixed with thc
June 11, 2022 at 11:40 am
Hello everybody , can anyone advise where I can purchase Root Wellness Hemp Flower Cbg Bud Bag?