Disk Cleanup and Defragmentation help for delete junk files. In this article, I will Explain What is Disk Cleanup and Defragmentation, and How to use them in windows 10.
What is Disk Cleanup?
The Windows Operating System creates a mass of temporary files and cached files all designed to speed up the performance of the Graphical Interface. These files do a good job when it needs. After that, they need to delete them. The result is a lot of files cluttering up your hard drive.
Files that have inscrutable names and an unknown purpose. This is a new tool that included windows. When you run it, Disk cleanup checks for files that can be safely deleted and then presented a listing of such files.
Windows is like its DOS predecessors in that when it writes a file to your disk, it puts it anywhere it finds room. As you delete and create files, over time a single file can have a piece here, a piece there, another piece somewhere else. When a file is spread over multiple places, it’s said to be fragmented.
Disk Defragment collects all fragmented files then arranged all files one by one. it helps to improve your hard disk performance and optimize your Drives. You should probably run Disk Defragmenter about once a month.
How To use Defragmentation
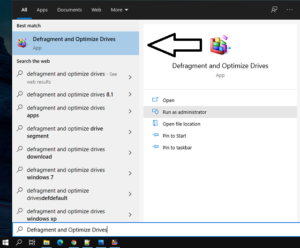
To Start click the start button, then write Defragment and Optimize Drives.
After that, you will see the Defragment and Optimize Drives app then click that app.
Then you need to select drive c,d, and click the optimize Button it will start automatically.
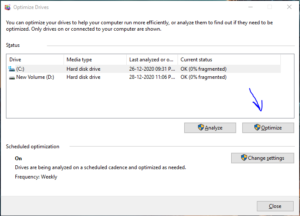
It takes some time depending on your hard disk drive size.
After complete the process, your hard disk will be Defragmented then click the close button.
If you like the article please comment below to improve our articles
Microsoft Word is one the most useful Software for office work, Student presentation, and many more. We use Curve, bend, and wrap text in ms word many times as an office, collage, School presentation Heading. In this article, You will know how to Write Curve, bend, and wrap text in ms word Step by step.
Why do we use Curve, bend, and wrap text in ms word?
Curved text is used when you design a flyer, newsletter, and logo in your Word document to enhance the look of the presentation. Microsoft Word has a very easy way to Write Curve, bend, and wrap text.
How to Write Curve, bend, and wrap text in MS Word Step by step:
Step 1: Open the new or an existing Word document.
Step 2: Highlight or select the text that you want to curve, bend, or warp.
Step 3: Go to the Insert tab on the Ribbon and click on the WordArt icon in the Text section.
Step 4: A list of WordArt will appear. Select the letter style from the WordArt list to apply to the text.
Step 5: Once WordArt is added to your text, a new menu Drawing tool is created automatically. Now, go to the Format tab on the Ribbon and click on the drop-down icon then click Text Efforts in the WordArt Styles section.
Step 6: Click on the Transform option from the Text Effects drop-down menu. Select the curve that you want to apply in the selected text.
Result: Now your Selected word is Transformed in your chosen style(Curve, bend, and wrap).
I hope you get the all information about How to Write Curve, bend, and wrap text in ms word. If you like this article, you can share and comment. So that we too have a chance to learn something from your ideas and improve something.
Lookup is one of the most used full functions in Microsoft Excel. It’s used to categorize under Excel Lookup and reference functions. In this article, I explain What is the Lookup function in Excel | Explain V and H lookup Function
Explain Lookup function in Excel
The LOOKUP Function is categorized under Excel Lookup and reference functions. This section discusses various techniques that you can use to look UP a value in a range of data Excel has three functions(LookUP, V LookUP, H LookUP) designed for this task.
A Look-UP formula essentially returns a value from a table by looking up another related value. A common telephone directory provides a good analogy. If you want to find a person’s telephone number, You first locate the name and then retrieve the corresponding number.
Example of LookUp Function in Excel :
In Worksheet that uses Several look UP formulas. This Worksheet Contains a table of employee data, beginning in row 7. This range name is EmpData. When you enter the last name into cell C2, lookup formulas in D2:G2 retrieve the matching information from the table. If the last name does not appear in column C, the formulas return.
The following lookup formulas use the Vlookup function:
D2 = VLOOKUP (C2, EmpData,2,FALSE)
E2 = VLOOKUP (C2, EmpData,3,FALSE)
F2 = VLOOKUP (C2, EmpData,4,FALSE)
G2 = VLOOKUP (C2, EmpData,5,FALSE)
Explain V-Lookup Function in Excel
The VLookup function looks up the value in the first column of the lookup table and returns the corresponding value in a specified table column. So, the lookup table arranges vertically.
The syntax for the VLookUp Function is: VLOOKUP(lookup_value,table_array,col_index_num,range_lookup)
The VLookup Function’s arguments are as follows:
lookup_value: The value is to be in the first column of the lookup table.
table_array: The range that contains the lookup table.
col_index_num: The column number within the table from which the matching value is in return.
range_lookup: Optional. If TRUE or omitted, an approximate match is returned. However, If FALSE, Vlookup will search for an exact match and, if Vlookup can’t find an exact match, the function returns #/NA.
Explain H-Lookup Function in Excel
The HLookup function works just like the VLookup function except that the lookup table is arranged horizontally instead of vertically. The HLookup function looks up the value in the first row of the lookup table and returns the corresponding value in a specified table row.
The syntax for the HLookUp Function is: HLOOKUP(lookup_value,table_array,row_index_num,range_lookup)
The HLookup function’s arguments are as follows:
lookup_value: The value is to be in the first row of the lookup table.
table_array: The range that contains the lookup table.
row_index_num: The row number within the table from which the matching value is in return.
range_lookup: Optional. If TRUE or omitted, an approximate match is returned. However, If FALSE, Vlookup will search for an exact match and, if Vlookup can’t find an exact match, the function returns #/NA.
I hope you get the all information about Explain Lookup function. V and H lookup Function in Excelwith Example. If you like this article, you can share and comment. So that we too have a chance to learn something from your ideas and improve something.
Graphics help us to see the photo, video, Animation Popularly, and Vector Graphics are sharp and detailed than Raster Graphics. In this article, I Explain the Difference between Vector and Raster graphics with Examples.
What is the difference between Vector and Raster graphics?
Graphics are part of Multimedia. In Digital media like Photo, Video, Animation all these things are made by graphics. Graphics are two types Vector Graphics and Raster Graphics.
Vector Graphics
Raster Graphics
Vector Graphics are composed of paths.
Raster graphics are composed of pixels.
Vector Graphics such as a.eps file or Adobe Illustrator file are composed of paths or lines, that are either straight or curved.
Raster graphics Such as a .gif .jpeg is arranging of pixels of various colors, which together form an image.
The data file for a Vector image contains the points where the paths and ends how much the path curve, and the colors that either border or fill the paths.
Raster graphics, on the other hand, become “blocky” since each pixel increases in size as the image is larger.
Vector Graphics is Capable of detailed editing.
Raster graphics are Less detailed but offer precise paths.
Raster Graphics saved as JPG, GIF, PNG, TIF, BMP Format.
I hope you get the all information about the difference between Vector and Raster graphics with Example. If you like this article, you can share and comment. So that we too have a chance to learn something from your ideas and improve something.